 |
Workshop >Script
>Guidance
>Manual-1.7.4.0
|
| The way to create
an art work "Shinjyuku". |
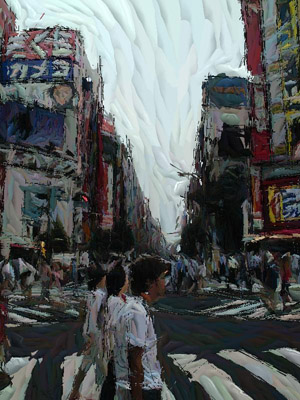
| In this corner, Abstract of usage of SIC is shown.
To do that, we will take example by "Shinjyuku"
which has got an excellent award at 9th Toyama CG Contest. |
Preparation
|
|
The photo image for SIC is better to be applied by a blur filter
because almost every images has artifacts coursed to jpeg compression.
The photo image is shown below.
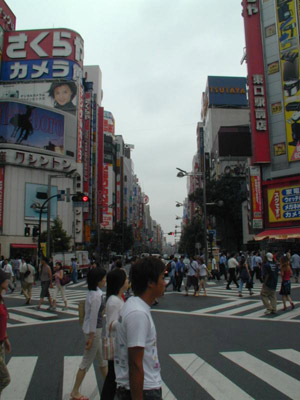
This image was captured by a digital camera. Such type of image
has visible noise is less than other images but they usually have
square noises by jpeg-compression and excessively enhanced edge.
That why, You have to chose
filter->blur->Gaussian-blur(blur radius=3).
For a preparation of the processing, Let's make new directory named
"Shinjyuku" and put the this photo image into the directory.
Let us call this directory a working directory.
>mkdir Shinjuku
>cd Shinjyuku
>cp ../shinjyuku.jpg .
From now on, the new files created in the process is in the working
directory.
Then, run the Gimp.
>gimp
Of course, in this time, SIC's plugins have to be in the .gimp-1.x/plug-ins.
|
| Common processing for
every SIC creation (not recorded in the history) |
|
Created image by SIC has a record that what kind of plugins are
applied. That record is called the history. If you read the history,
You can make the similar creation. Almost all of scripts are recorded
into the history, but several common scripts that always applied
to the image are doesn't recorded. Two plugins in this section are
such type of plugins.
[Gklab]
The processes below are applied to the image finished preparation
above. The first plugin "Gklab" has the function to convert rgb
color space into lab color space.
First, Adjust the pointer of your mouse on this image and click
a right button. Then, a pulldown menu will appear.
Chose the "Synergistic->1->Gklab" from the
menu.

The parameter window below will appear.
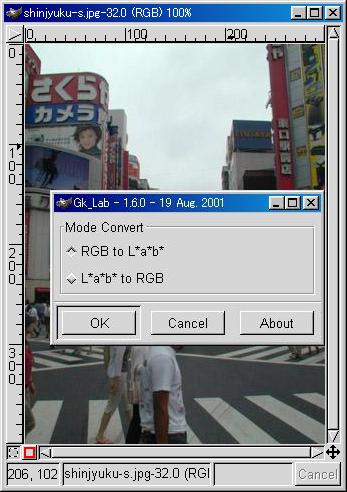
The parameter you can chose is only a mode parameter. You have to
neglect a (dummy) parameter. All SIC process have to be executed
in a Lab color space, chose the "RGB to L*a*b*" and click
"OK", then, this image turned into a pinkish image.
[1GkDirec]
On this pink image, click the right button to get the pulldown menu.
Then, get a chose "Synergistic->1->1GkDirec "
Because 1GkDirec has no parameter to chose, just put the "OK".
When this process is finish, new red image appear on another window.
This image is the result of edge elements extraction. Let us call
this image an edge image from now on.
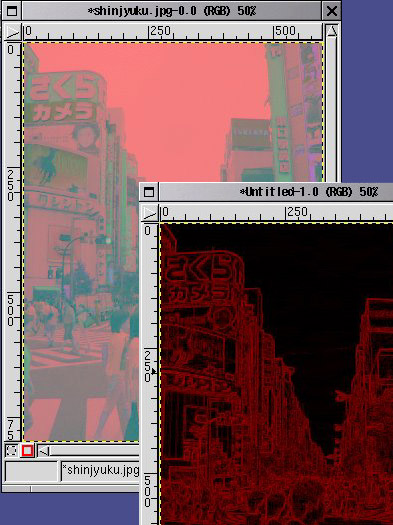
These processes are always required for every SIC creation.
|
Plugins for Image Analyzing (recorded in the
history)
|
|
[2GkMeanAlgo]
On this pink image, click the right button to get the pulldown menu.
Chose "Synergistic->1->2GkMeanAlgo".
The window below open.

"Source 1" = the red image and
"1 Segment Number" = 1 AdaptiveInitialValue.
Chose the red image as "Source 1".
You can select 0 Fixed Initial Value or 1 Adaptive Initial
Value as "1 Segment Number".
Hints of selection of "1 Segment Number".
0 Fixed Initial Value produces similar sized blush strokes
and this condition dose not terribly break the taste of the original
photo.
1 Adaptive Initial Value produces large sized blush strokes
on little texture background.
To draw sky part boldly by large brush strokes, 1Adaptive Initial
Value is selected. Other parameter are left to be default value.
This process need about 5 minutes which depends on a CPU or an image
size.
When the process is finished, a green image emerges and the file
named "map" is created in the working directory where
gimp was started.
"2 Weight L*" = 4,
"3 Weight a*" = 1,
"4 Weight b*" = 1,
"5 Weight function for Color" = 4,
"6 K" = 0,
"7 Threshold" = 10,
"8 Direction X" = 50,
"9 Direction Y" = 50 and
"10 Divided segments Number" = 3.
Attention
If you use Windows, it is basically same. However, if you start
by clicking a GIMP shortcut on the desktop, a map file is created
in C:\Program Files \GIMP\images.
[Current Parasite...]
Current Parasite shows the comments in parasite.
The comments show that this image have been created by what plugins
with what parameters. That's why, you can understand how to create
a same kind of image by your SIC.
This is very important characteristics of SIC. We regard not only
image but also the comments as a artwork. Because we adopted this
manner, all works created by SIC become references for a creation
of new work.
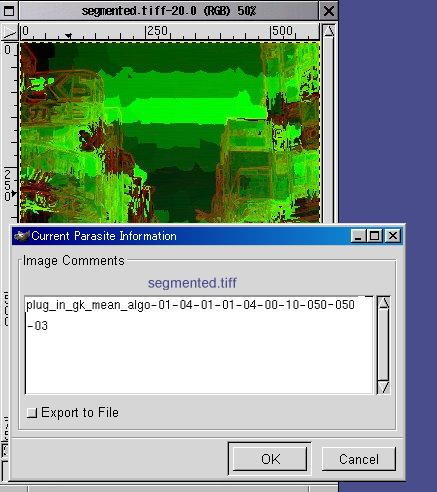
The image above has comments: "plugin_gk_mean_algo-01-04-01-01-04-00-10-050-050-03"
in its comment line. It has 10 number groups and each number group
corresponded to each parameter cumbered by from 1 to 10 in the GK_Mean_Algo
window.
First 01 mean1 Adaptive Initial Value or only 1 is
left in a comment line. If 0 Fixed Initial Value is selected,
it would be shown by 00. This comment line has no the name
of a selected edge image as source1 and dummy. It makes this
plugin to save this information to check the box "Export to
File" and to click the "OK".
[3GkAddPrincipal]
We need to analyze this image.
On this green image, click the right button to get the pulldown menu.
When you chose "Synergistic->1->3GkAddPrincipal",
the window below is appear.
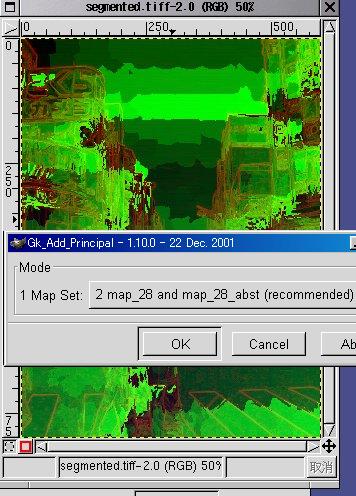
The only parameter you can select is "mode".
"2 map_28 and map_28_abst(recommended)" should
be selected without special intention.
This process make new files "map_28" and "map_28_abs"in
the working directory but the image dose not change.
As the result of this process, in the comment lines of the green
image new line is added which becomes
plug_in_gk_mean_algo-01-04-01-01-04-00-10-050-050-03
plug_in_gk_add_principal-02.
"2 map_28 and map_28_abst(recommended)" is expressed
by 02.
[4GkIMerge]
On this green image, click the right button to get the pulldown menu
again.
And select "Synergistic->1->4GkIMerge " in
the menu.
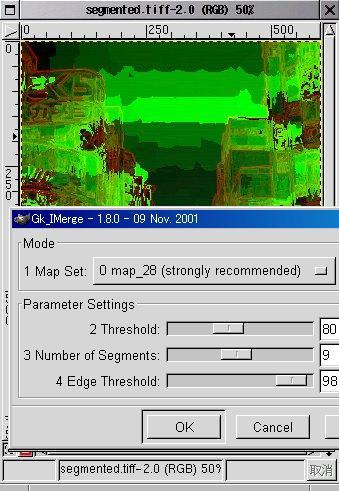
"1 Map Set"= 0map_28(strongly recommended),
"2 Threshold"= 80,
"3 Number of Segments"= 9 and
"4 Edge Threshold"= 98.
On the emerged pop-up window, "0map_28(strongly recommended)
" is usually selected as mode parameter. We selected default
value for other parameters, but if you need higher fidelity of a
work, The higher value;for example 150, must be selected as "2
Threshold"
This plugin make new file "map_28_merged"
As the result of this process, in the comment lines of the green
image new line is added which becomes
plug_in_gk_mean_algo-01-04-01-01-04-00-10-050-050-03
plug_in_gk_add_principal-02
plug_in_gk_imerge-00-080-09-098
[GkAnalyse]
This plugin is last one of analyzing process. Like former plugin,
click the right button on this green image to get the pulldown menu.
And select "Synergistic->3->GkAnalyse ."
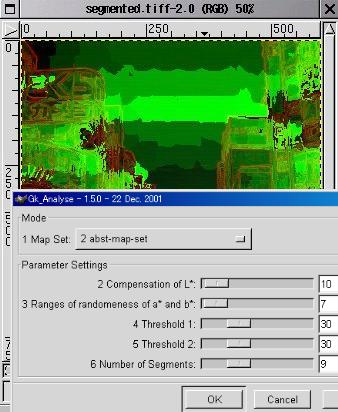
"1 Map Set" = 2 abst-map-set.
Basically SIC has three deferent map sets. This plugin creates one
of these three map sets for preparation of a next step. Because
one of three was already created by previous processing, two of
three are selected and created here. The one is 0 imp-map-set
and the another is 2 abst-map-set. You can chose one
of them as "1 Map Set". In the art work"Shinjuku",
We chosen 2abst-map-set.
0 imp-map-set can create relatively faithful image to the
original photo image. This plugin make new files "map_28_imp"
and "map_28_merged_imp."
2 abst-map-setcan create the image which has brush strokes
that are grown by around strong texture. In the result, the work
should be with many strong brush strokes and face or something should
be warped badly.
This plugin changes the file"map_28_abst" and create
a new file "map_28_merged_abst."
"2 Compensation of L*" =10,
"3 Ranges of randomness of a* and b*"=7,
"4 Threshold 1" =30,
"5 Threshold 2"=30 and
"6 Number of Segments" =9.
This work was created in a condition that other parameters are left
default value. However, we explain Other parameters
If "2 Compensation of L*" takes large value, painting
like compensation of brightness becomes large. Then, if you need
fidelity, this one need to be 0 or small value.
The larger value of "3 Ranges of randomness of a*b*"
is, the larger variance of color is.
If this value would be set appropriately, you could get color scheme
like impressionist's.
After processing, new window open but you need not mind it and just
close it.
So far the comment lines of the green image become
plug_in_gk_mean_algo-01-04-01-01-04-00-10-050-050-03
plug_in_gk_add_principal-02
plug_in_gk_imerge-00-080-09-098
plug_in_gk_analyse-02-10-07-030-030-09,
Where 02 of plug_in_gk_analyse-02 means "2
abst-map-set".
At this point, you'd better save this green image by lossless compression
file format like tiff file format. Tiff file save not only image
but comment lines. With saving the image, you can have break and
continue it later by loading the tiff-file.
|
Plugins for expressions (recorded in
the history)
|
|
From now on, plugins are executed for image expression by using
of analyzed data.
[4GKReconstImage]
Let's click the right button on this green image to get the pulldown
menu. And, select "
Synergistic->1->4GKReconstImage"
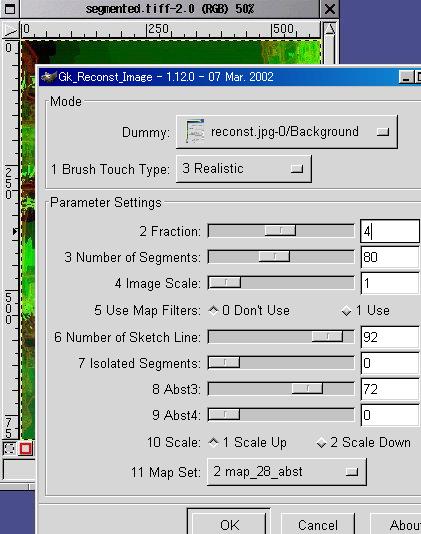
"1 Brush Touch Type" = 3Realistic
Selection of "1 Brush Touch Type" creates many
types of brush stroke. The most usual one is 3 Realistic.
Let us explain other parameters of this plugin.
"2 Fraction" = 4
"3 Number of Segments" = 80
"4 Image Scale" = 1
"5 Use Map Filters" = 0
"6 Number of Sketch Line" = 92
"7 Isolated Segments" = 0
"8 Abst3" = 72
"9 Abst 4" = 0
"10 Scale" = 1
"11 Map Set" = 2
"4 Image Scale"means scale of image. You can enlarge
size of an original photo image without any jaggy or any other defects.
If 1ScaleUp as "10 Scale"is selected,
"4 Image Scale" getting large makes image large. You
have to put same value as "2 Image Scale" in 5GKSubstColor.
"6 Number of Sketch Line" getting smaller increases
the sketch lines. If this value = 0, all brush strokes become
line. In the art work"Shinjuku", this value was
92.
The value of "11 MapSet" is according to the sort
of map-sets.
0 -> map-set
1 -> imp-map-set
2 -> abst-map-set,
In the art work "Shinjuku", because2abst-map-set
as "1 Map Set" was selected at previous plugin,
it is natural to select 2 as "11 Map Set".
After the processing, a green reconstructed image appear.
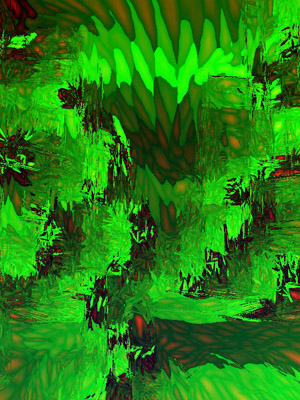
The comment line are
plug_in_gk_mean_algo-01-04-01-01-04-00-10-050-050-03
plug_in_gk_add_principal-02
plug_in_gk_imerge-00-080-09-098
plug_in_gk_analyse-02-10-07-030-030-09
plug_in_gk_reconst-03-4-80-1-0-092-000-072-000-1-02,
where 03 of plug_in_gk_reconst-03 means 3 Realistic.
[4GKReconstImage]
On the newly created green image, click the right button to get a
pulldown menu.
Then, get a chose"Synergistic->1->5GKSubstColor"
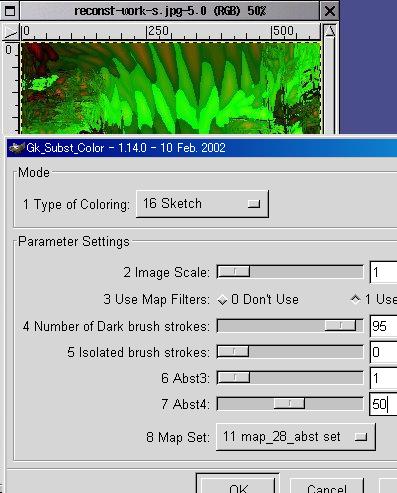
"1 Type of Coloring" = 16 Sketch.
To express humidity and hotness in the summer into the artwork "Shinjuku",
special brush coloring 16 Sketch as "1 Type of Coloring"
was selected .
"2 Image Scale" = 1,
"3 Use Map Filters"= 1 USE ,
"4 Number of Dark brush strokes" = 95 and
"5 Isolated brush strokes" = 0.
It increases dark brush strokes for "4 Number of Dark brush
strokes" going small value. This value must less than "6Number
of Sketch Line" in [4GKReconstImage] because it
make you feel strange that brush strokes except thin sketch lines
are colored by black.
"4 Number of Dark brush strokes" larger than "6
Number of Sketch Line" in [4GKReconstImage] creates
sketch lines of not dark. We selected 95 as "4 Number
of Dark brush strokes."
"6 Abst3" = 1 and
"7 Abst4" = 50.
When 16 Sketch as "1 Type of Coloring"
is choose, "6 Abst3"=0 or 1 is selected.
Choosing1 as "6 Abst3"make "7 Abst4"
the parameter modulating solidity of brush strokes.
In this art work "Shinjyuku", we selected 50
as "7 Abst4", because we want to stand out solidity
of brush strokes to make unusual feeling.
After finish of this processing the pink image appears.
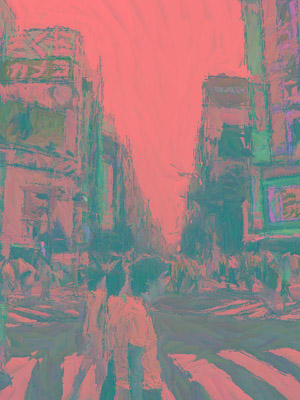
The comment line of this image are
plug_in_gk_mean_algo-01-04-01-01-04-00-10-050-050-03
plug_in_gk_add_principal-02
plug_in_gk_imerge-00-080-09-098
plug_in_gk_analyse-02-10-07-030-030-09
plug_in_gk_reconst-03-4-80-1-0-092-000-072-000-1-02
plug_in_gk_subst-16-1-1-095-000-001-050-11,
where 16 of plug_in_gk_subst-16 means 16 skech.
The discription of comment line is enough to create the work "Shinjuku".
You can create your own work by referring to this description and
changing some parameters a little.
|
After-processings (not recorded
in the history)
|
[Gklab]
On this pink image, click the right button to get a pulldown menu.
Then, get a chose "Synergistic->1->1GkDirec ".
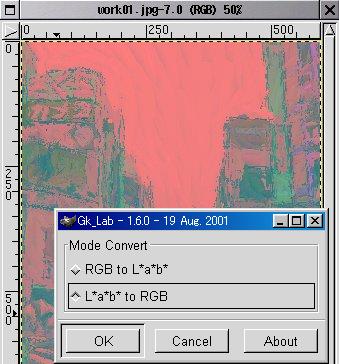
Because this image need transformation from L*a*b* to RGB, you select
"L*a*b* to RGB" and click "OK".
Then, you get the image below.
Thus the image above is created. This image usually need adjustments
of color or something according to your taste. Such left processes
that this image needs can be executed by GIMP. |
|